I'm getting ready to build a Joyrider type of sim and will be making it from square metal tubes. I will be using wiper motors for the motion. My questions to those that have done the same type of setup are:
1- Do we need to use a pulley on the wiper motor?
2- What is the best method of attachment? Steel cable or fan belt?
3- Would I be correct on assuming the motor that moves you left and right would be best attached toward the outside of the frame to help with leverage?
Thanks in advance, Erik
Starting a joyrider setup
8 posts
• Page 1 of 1
Starting a joyrider setup
![]() by eloverphx » Mon 14. May 2012, 06:04
by eloverphx » Mon 14. May 2012, 06:04
- eloverphx
- Posts: 20
- Joined: Fri 20. Apr 2012, 10:25
- Location: Onalaska, Wisconsin
- Has thanked: 0 time
- Been thanked: 0 time
Re: Starting a joyrider setup
![]() by motiondave » Mon 14. May 2012, 10:06
by motiondave » Mon 14. May 2012, 10:06
Hello Erik,
One persons information here , I built mt first ride as a "joyrider" frame using wipers with their existing levers for motion. I didnt use pulleys, See videos:-
http://www.youtube.com/watch?v=fKAcXtnxHXU
http://www.youtube.com/watch?v=Yrlzl3Ie7Z8
The sim was unbalanced in the inside frame and I didnt work on profiles too much, but it moved well.
The pulley system, like what tronic did , will give you big overall movements and may really suit flight sim better than racing, but that depends on you liking for movement.
I put my motors on outside frame, on a far edge, inside frame behind the seat and connecting to shoulder height. This takes advantage of LEVERAGE.
Oh, and I use the famous Pololu JRK 12v12 control boards.
Hope this help.
Cheers, David.
-

motiondave - Posts: 997
- Images: 1
- Joined: Tue 20. Mar 2012, 16:36
- Location: Sydney Australia
- Has thanked: 11 times
- Been thanked: 13 times
Re: Starting a joyrider setup
![]() by motiondave » Mon 14. May 2012, 13:04
by motiondave » Mon 14. May 2012, 13:04
nice looking job there, it should move well.
-
motiondave - Posts: 997
- Images: 1
- Joined: Tue 20. Mar 2012, 16:36
- Location: Sydney Australia
- Has thanked: 11 times
- Been thanked: 13 times
Re: Starting a joyrider setup
![]() by sirnoname » Mon 14. May 2012, 16:26
by sirnoname » Mon 14. May 2012, 16:26
There are also SCN6 joyrider on the commercial market.
However if you do not have them side by side you cannot compare them
However if you do not have them side by side you cannot compare them
If a answer is correct or did help you for a solution, please use the solve button.
-

sirnoname - Site Admin
- Posts: 1829
- Images: 45
- Joined: Thu 1. Sep 2011, 22:02
- Location: Munich, Germany
- Has thanked: 35 times
- Been thanked: 129 times
Starting a joyrider setup
![]() by eloverphx » Mon 14. May 2012, 19:48
by eloverphx » Mon 14. May 2012, 19:48
Thank you for all of your comments so far. I sure I will have many more questions along the way.
Motion Dave I like your setup, but like bob I am looking for a little more motion since I would like to flight sim as well as race. I am wondering if I could make your setup and just make it a little longer and maybe a little taller to get more degrees motion.
Bob - you setup looks a bit too big for me. That looks like it might take up an entire garage..
Both good looking units though. I do have a million questions coming to mind * Such as the casters used for the pivot points. Where did you find them and sizing? After talking to a couple others they are saying 1-1/2" square tubing for the outside base frame and 1-1-1/4" for the rest. Does that sound right? Dave what did you use? Do you have any flex problems?
Thanks guys for the assistance.
I'm hoping to have my electronics working tonight. Have one side of my h-bridge not reversing at full speed. But finally got tronic's h-bridge 75% working.
Motion Dave I like your setup, but like bob I am looking for a little more motion since I would like to flight sim as well as race. I am wondering if I could make your setup and just make it a little longer and maybe a little taller to get more degrees motion.
Bob - you setup looks a bit too big for me. That looks like it might take up an entire garage.
Both good looking units though. I do have a million questions coming to mind * Such as the casters used for the pivot points. Where did you find them and sizing? After talking to a couple others they are saying 1-1/2" square tubing for the outside base frame and 1-1-1/4" for the rest. Does that sound right? Dave what did you use? Do you have any flex problems?
Thanks guys for the assistance.
I'm hoping to have my electronics working tonight. Have one side of my h-bridge not reversing at full speed. But finally got tronic's h-bridge 75% working.
- eloverphx
- Posts: 20
- Joined: Fri 20. Apr 2012, 10:25
- Location: Onalaska, Wisconsin
- Has thanked: 0 time
- Been thanked: 0 time
Re: Starting a joyrider setup
![]() by motiondave » Thu 17. May 2012, 10:10
by motiondave » Thu 17. May 2012, 10:10
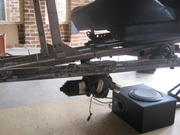
Ok, here is some info on mine. I used scrap steel I had, so the outside frame was 20mm x 2 welded on top of each other, the inside was a static frame of extruded scrap aluminium, but 25mm x 25mm x 1.6mm steel would have done the job.

It did not ever flex and had 110kg of driver in it (not me, I weigh 80kg).
The pivot point bearing can be seen to the right of the next picture. I basically went to bearing shop and asked for a bearing to suit a 12mm bolt and he also sold me a mount for the bearing to sit in. They cost me $30 each for bearing and thing to mount in, no I do not remember what it is called.
I made the outside frame about 50mm wider on each side than the inside and the length I determined from the amount of swing forward and back. I think I allowed 150mm room.
Hope that helps a bit.

It did not ever flex and had 110kg of driver in it (not me, I weigh 80kg).
The pivot point bearing can be seen to the right of the next picture. I basically went to bearing shop and asked for a bearing to suit a 12mm bolt and he also sold me a mount for the bearing to sit in. They cost me $30 each for bearing and thing to mount in, no I do not remember what it is called.

I made the outside frame about 50mm wider on each side than the inside and the length I determined from the amount of swing forward and back. I think I allowed 150mm room.
Hope that helps a bit.
-
motiondave - Posts: 997
- Images: 1
- Joined: Tue 20. Mar 2012, 16:36
- Location: Sydney Australia
- Has thanked: 11 times
- Been thanked: 13 times
Starting a joyrider setup
![]() by eloverphx » Sat 30. Jun 2012, 06:27
by eloverphx » Sat 30. Jun 2012, 06:27
Ok finally getting some work done on my sim after a lot of down time. I have to get this mostly built before I move to Wisconsin around August. I have more resources and friends to help me here in Phoenix.
Anyways here is my drawing of what I have in mind for my cockpit portion of the simulator. Side view and top view just for width dimensions.
Please give me some input if I am not on the right track as I plan on getting materials this weekend. Thanks everyone.
Anyways here is my drawing of what I have in mind for my cockpit portion of the simulator. Side view and top view just for width dimensions.
Please give me some input if I am not on the right track as I plan on getting materials this weekend. Thanks everyone.
 Viewed 5045 times")
- eloverphx
- Posts: 20
- Joined: Fri 20. Apr 2012, 10:25
- Location: Onalaska, Wisconsin
- Has thanked: 0 time
- Been thanked: 0 time
Starting a joyrider setup
![]() by eloverphx » Sat 30. Jun 2012, 18:36
by eloverphx » Sat 30. Jun 2012, 18:36
Thanks bob. I was going to start a project page as soon as I started the cutting and assembly of the project. I just wanted to make sure I was on the right track.
So now off to buy my metal and get this freight train rolling!
So now off to buy my metal and get this freight train rolling!
- eloverphx
- Posts: 20
- Joined: Fri 20. Apr 2012, 10:25
- Location: Onalaska, Wisconsin
- Has thanked: 0 time
- Been thanked: 0 time
8 posts
• Page 1 of 1
Return to Motion simulator building Q&A
Who is online
Users browsing this forum: No registered users and 1 guest
